Skip to content
Sensory Nutrition
Variety of fruits, vegetables, and nuts.
  • Home
  • Recipes
    • Beverages
    • Desserts
    • Entrees
    • Rolls
    • Salads
    • Side Dishes
    • Soups
  • Menu
    • Christmas
    • Holiday Baking
    • Thanksgiving
  • Guest Blogs
  • Resources
    • 10 Tips
    • eBooklets
    • Links
    • US Dietetic Orgs
    • Int’l Dietetic Orgs
    • Other RD Blogs
  • About

Holiday Baking – Cookie Making Tips

Posted on December 15, 2011, updated on December 26, 2011 by Stephanie.

If you are making any type of drop sugar cookie recipes up this holiday season, here are some easy to remember tips to keep in mind…

• Please remember to follow any recipe directions. Different methods will yield very different results so following the method given is important for cookie success.

• Honey or maple syrup or other sugar syrups (such as corn syrup) will improve browning in baked goods, including if some is included for part of the “sugar” ratio in specific cookie recipes. A little bit of syrup can go a long way. Such syrups are hygroscopic and adding some of them in a recipe to replace some of the “sugar” in the recipe means that the cookies will stay softer longer after baking off (both syrups and honey act as humectants in baked goods).

• Sugar cookies that are the drop style do best when you refrigerate the dough at least 24 hours and preferably 36 hours before baking them off. Not only will the flavor better develop in them, but the fat will be well chilled and there will be less cookie spread that way.

• Definitely keep the cookie dough refrigerated between baking them off on cookie sheets or pans in the oven–that is very critical as the dough needs to stay truly refrigerator cold before it hits that hot oven air.

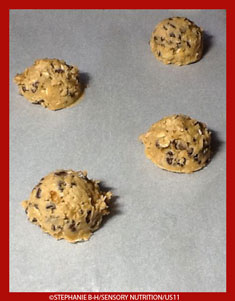
• Don’t crowd cookies on your silicone-coated baking parchment lining your cookie sheets or pans.  Space cookies out based on their size and anticipated cookie spread as they bake off in the oven.

Note in the picture that the cookies are “offset” from one another.

When the next group of cookies are baked, they will be in the “empty” spaces now showing on the baking parchment and any crumbs that might be on the parchment from the previous batch of cookies will be previously scraped off with an offset spatula that is used to remove the baked cookies before new scoops of cookie dough go down on the baking parchment paper.

By using double-sided silicone-coated baking parchment paper, the paper can be “flipped over” to the other side and it will be fresh for use for the next two sheets of cookies going into the oven.

• Never bake off drop sugar cookies for as long as you think they need to bake while still in the oven.

The cookies will continue to bake even AFTER you remove the cookie sheet or cookie pan from the oven as that sheet or pan is still very hot.

As the cookies hit the room air temperature, they will start to firm up–give them those extra seconds to do so. If the drop sugar cookies have been properly baked, you don’t have to “rush” to get them off the silicone coated baking parchment paper. Let them set up a minute or two.

• It is key is to NEVER over bake them while they are still in the oven.

• No one wants the cookies to overcook, so once the cookies start to set up after coming out of the oven, then promptly remove them from the baking sheet to a proper wire cookie cooling rack.  Many folks like cookies still warm from the oven, but before storing, be sure the cookies are COMPLETELY cooled off.


• Allow the cookie sheets to cool COMPLETELY between batches! NEVER put cold cookie dough on a silicone coated parchment paper lined cookie sheet if the cookie sheet is still hot as that leads to excessive cookie spread.

• Cookie size, distance between cookies, number of cookie sheets in the oven at once, types of cookie sheets, and actual oven temperature will ALL affect how long it takes to bake the cookies off. If you rotate the pans half way through baking, that will increase the time it takes for the cookies to finish baking off as well.

• How you store a cookie will affect how much moisture it absorbs from its “environment” and you can indeed make choices that will influence that environment.

Metal tins are most often used to store say butter cookies. Bar cookies do best when stored in plastic wrap lined tins, including the reusable type decorative aluminum foil ones, or in plastic air-tight sealed containers.
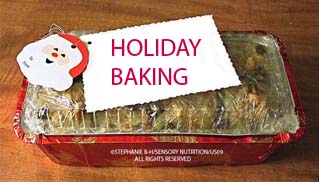
Dry air with low humidity dries cookies out (winter time air is often heated in say the Northeast where I live, so it will dry things out; while in a humid location the opposite might be true if say one has tropical air with high temperature but also super high humidity).

Pick your storage option wisely based on the type of cookie and the environment you want it in to maintain its best quality.


About Stephanie

Stephanie grew up in an Italian family and Italians are passionate about life! Every aspect of life is important to them: living, loving, family, food, and all things cultural. Stephanie is an American Heart Association award-winning professional and also is a Registered Dietitian (RD)/Registered Dietitian Nutritionist (RDN) and is a State credentialed certified / Licensed Dietitian Nutritionist.

View all posts by Stephanie

Posted in Desserts, Holiday Baking, Winter Holiday

Post navigation

Chia Seeds Get A Thumbs Up!
BÛCHE De NÖEL (Yule Log/ Holiday Log Cake/Chocolate Cream Roll aka Sponge Cake)

Sidebar

Mission Statement

Our mission is to offer a blog that encourages you to expand your sensory enjoyment of tasty food, rich in vital nutrients, to help you maximize your health and enjoy a flavorful life. See it, Smell it, Taste it!

Welcome

Welcome to Sensory Nutrition! Please come in and join Stephanie and the rest of the staff here.

The doors at Sensory Nutrition are usually open 24/7, so come in and visit with us when YOUR schedule allows. We would love to share some of our secrets for nutritious and delicious meals you can make as part of your busy 21st century lifestyle.

Whether cooking for one or for many, our motto is: Get more out of life and enjoy life more.

Let food be your source of nutrients to fuel your lifestyle and delight your senses!

Archives

  • May 2018 (1)
  • March 2015 (1)
  • June 2014 (2)
  • March 2014 (4)
  • July 2013 (1)
  • June 2013 (1)
  • May 2013 (4)
  • April 2013 (4)
  • March 2013 (4)
  • February 2013 (4)
  • January 2013 (5)
  • December 2012 (8)
  • November 2012 (5)
  • October 2012 (5)
  • September 2012 (4)
  • August 2012 (5)
  • July 2012 (8)
  • June 2012 (9)
  • May 2012 (5)
  • April 2012 (5)
  • March 2012 (7)
  • February 2012 (7)
  • January 2012 (7)
  • December 2011 (17)
  • November 2011 (23)

Recent Comments

  • Stephanie on Fearless Holiday Baking With Yeast Part 1 of 2
  • Judy Wagg on Fearless Holiday Baking With Yeast Part 1 of 2
  • Rakibul Siddiki on Dishwasher Buying Considerations
  • Eloise Catron on Dishwasher Buying Considerations
  • Rohit mehta on Tasty Food Can Be Both Delicious and Nutritious

About Stephanie

Stephanie grew up in an Italian family and Italians are passionate about life! Every aspect of life is important to them: living, loving, spirituality, family, food, and all things cultural.

Stephanie is an American Heart Association award winning Registered Dietitian (RD) and NY State credentialed Certified Dietitian-Nutritionist (CDN).

With solid expertise built over more than three decades of practice and spanning six states, Stephanie's background includes being a seasoned clinician, consultant, educator (including full-time professor), presenter, author, researcher, program coordinator, consumer scientist (including recipe developer), advocate, counselor, coach, and mentor.

Read More...

Related Articles

Fearless Holiday Baking With Yeast Part 2 of 2

In Part 1 of 2 of our series on baking with yeast, we mentioned a bit about the history of baker’s yeast and some details concerning fresh yeast and active dry yeast. In this Part 2 of 2 of our baking with yeast series, we’ll discuss how to “proof” or “bloom” active dry yeast prior to incorporating it into recipes, as well as the various offerings under the category of instant dry yeast and some pointers when it comes to using it. Also feel free to check out our accompanying picture-based recipe blog post on how to make G’s Heavenly Cinnamon Rolls.

Read MoreFearless Holiday Baking With Yeast Part 2 of 2

Read more Fearless Holiday Baking With Yeast Part 2 of 2

Fearless Holiday Baking With Yeast Part 1 of 2

Are you a seasoned home baker who doesn’t hesitate to work with yeast dough, or does the thought of working with baker’s yeast make you nervous? Have you ever wished you knew more about yeast baking so that you would always be successful in working with any form of baker’s yeast sold to consumers? Have you ever wished you could get some yeast risings to go a bit faster to save some time making a recipe from start to finish? Have you ever wondered about the differences between fresh yeast, active dry yeast, and instant dry yeast? We’d love to

Read MoreFearless Holiday Baking With Yeast Part 1 of 2

Read more Fearless Holiday Baking With Yeast Part 1 of 2

Holiday Yeast Baking: G’s Heavenly Cinnamon Rolls

G’s Heavenly Cinnamon Rolls recipe was adapted from other cinnamon rolls recipes by our webmaster to have a more heathful profile overall for baking a yeast-based cinnamon roll. Each 3+” diameter cinnamon roll from the adapted recipe features an overall lower fat and lower saturated fat content than other typical cinnamon rolls, features applesauce as a replacement for fat in the actual dough, is higher in whole grain content through the use of some* white whole wheat flour to replace some of the all-purpose unbleached flour, is lower in overall sugars, yet when iced still offers the appeal of those

Read MoreHoliday Yeast Baking: G’s Heavenly Cinnamon Rolls

Read more Holiday Yeast Baking: G’s Heavenly Cinnamon Rolls

Footer

Visit us on Facebook

Copyright © 2025. All rights reserved. Sensory Nutrition. Privacy Policy | Accessibility Statement

Disclaimer