 In Part 1 of 2 of our series on baking with yeast, we mentioned a bit about the history of baker’s yeast and some details concerning fresh yeast and active dry yeast.
In this Part 2 of 2 of our baking with yeast series, we’ll discuss how to “proof” or “bloom” active dry yeast prior to incorporating it into recipes, as well as the various offerings under the category of instant dry yeast and some pointers when it comes to using it. Also feel free to check out our accompanying picture-based recipe blog post on how to make G’s Heavenly Cinnamon Rolls.
Proofing or Blooming Active Dry Yeast Before Baking With It
Before baking with yeast, it is recommended to bring any type of yeast to room temperature. This can be beneficial, especially if direct rehydration of dry yeast is involved, or even if you plan to mix the yeast with other dry or wet ingredients.
The following is offered only as infotainment as we always defer to instructions provided for consumers by any cultivator of various yeast product strains.
Weigh or measure any refrigerator stored dry yeast first when preparing ingredients for recipes. Getting out the yeast first will allow adequate time for the yeast to acclimate to room temperature.
Once all ingredients are measured out and you’re ready to assemble a yeast based recipe, it’s time to rehydrate the active dry yeast. This step is called “proofing” or “blooming” the yeast. We HIGHLY recommended this step when working with active dry yeast.
Room temperature active dry yeast (compared to instant dry yeast) prefers a lower temperature of any liquids being added to it. Most recipes will suggest a temperature between 100-110° F. This is critical to remember as active dry yeast granules are very, very temperature sensitive. It has been reported that the optimum lukewarm water temperature for cell membrane restoration of yeast is 104°F.
To “proof” or “bloom” (aka rehydrate and restart growth of) any dry yeast, remove some liquid from the recipe, preferably water, as well as remove some sugar to help the yeast grow (or plan to use a pinch of sugar if the recipe doesn’t call for any sugar). Note that although flour can be broken down over time into smaller carbohydrate forms such as sugar, the yeast prefers to have access to actual granular or liquid sugar for proofing purposes since the yeast growth needs to be proved in only minutes.
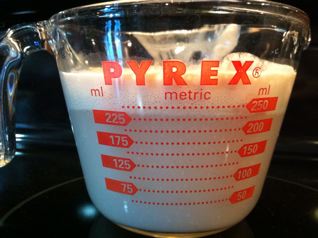
We prefer to use a clear glass measuring cup for this step. We like to observe the yeast growth and clear glass combined with a narrower diameter than a bowl allows us to quickly ascertain if the yeast is or is not rehydrating and reviving. Looking though the glass measuring cup you can see CO2 gas bubbles and then viewing from the top you can see the creamy foam.
NOTE: We cannot stress enough that active dry yeast should be at room temperature PRIOR to being proofed.

Key points for proofing active dry yeast:
- liquid from recipe (water +/or milk) should be heated to be between 100 -110 degrees F;
- sugar from the recipe can be as little as a pinch or up to 1 Tbsp. (we often use up to a tsp of sugar when proofing yeast since it is “fast” food source for growing yeast)
- you can cover the glass measuring cup with a clean kitchen towel while the yeast proofs.
NOTE: If the yeast was too old, however, even having those optimal proofing conditions cannot restore active yeast growth.
Step-by-step Proofing of Active Dry Yeast Before Baking With It:
- Fill a clear glass measuring cup [larger than 1 cup (greater than 240 ml) up to 2 cup (1 pint or 480 ml) size] with at least 1/4 cup (120 ml) of liquid up to 1 cup (240 ml) of liquid. Yeast likes water, but it could be milk from the recipe. Heat the liquid to between 100-110°F. Verify this using a properly sanitized calibrated food thermometer probe. In theory, active dry yeast is partial to being rehydrated with a yeast to lukewarm water ratio of 1:4;
- Add between a pinch of sugar (if you use more liquid in the measuring cup, you can add up to a tsp of sugar or even up to 1 Tbsp of sugar taken from the recipe). If the recipe doesn’t call for sugar, add just a pinch of sugar to help the yeast grow and stir to dissolve it in the liquid;
- Add the amount of measured, room-temperature active dry yeast that is enough to raise 4 cups of flour (usually ~0.25-0.33 oz or ~7-8.75 g; measuring ~ 2.25 tsp – 2.50 tsp.);
- If desired, loosely cover the top of the glass measuring cup with a clean kitchen towel and place in a warm location away from any drafts. (An empty microwave that is off would be a nice choice);
- Wait 5 minutes and you should see some CO2 gas production as evidenced by resultant bubbling of the rehydrating and growing yeast as it starts to rise in the clear glass measuring cup. If after 10 minutes there is no growth or only a meager slight increase, then the yeast should NOT be added to any recipe. Typically, active dry yeast rehydrates in 10 minutes.
Yeast baking can provide the opportunity for making some wonderful family memories and we hope you will give it a try during this holiday season.
Because it can rise more rapidly than active dry yeast, you might want to give instant dry yeast a try.
Baking With Instant Dry Yeast
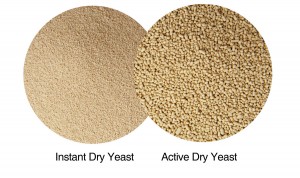
 Instant dry yeast comes in smaller granules than active dry yeast.
It is often sold in vacuum packaging, requiring only shelf storage prior to package opening.
Once opened, it should be stored air-tight in the refrigerator or freezer (in sealed freezer grade plastic bag with excess air squeezed out and then in as appropriate a air-tight refrigerator/freezer safe container).
It was developed in the 1970’s by Lesaffre and Flesichmann’s waited until the 1980’s to start offering versions of it to consumers.
(Image of Active Dry Yeast vs. Instant Dry Yeast granule sizes property of Angel Yeast and shown for illustrative purposes only).
Marketing departments love to come up with various ways to offer products to consumers. The following many names given by Fleischmann’s and Lesaffre to instant dry yeast products available to the public is evidence of that:
- Bread machine (dry) yeast typically is simply instant dry yeast. It is sold in small jars that can be kept on a shelf until opened and then it requires air-tight refrigerator/freezer storage;
- Pizza Crust Yeast (sold by Fleischmann’s) is again an instant dry yeast, but with dough relaxers added to it. Typically it is sold in a 3-packet form;
- Rapid Rise™ yeast (sold by Fleischmann’s) is again a form of instant dry yeast sold in a 3-packet form. Fleischmann’s notes that their RapidRise™ yeast loses its fast rising capabilities if dissolved in liquid, and will require two complete rises. Fleischmann’s suggests mixing RapidRise™ yeast with dry ingredients (flour, etc.) and then adding any liquid(s) at a temperature of 120-130° F. Fleischmann’s states that their RapidRise™ yeast is the same as their Instant Dry Yeast sold in warehouse clubs. Please follow Fleischmann’s suggestions for RapidRise™ yeast if you choose to use that yeast;
Lesaffre instant dry yeast offerings typically include:
- RED STAR® Quick-Rise™ Yeast sold in a 3-packet form;
- RED STAR® Bread Machine Yeast; SAF® Gourmet Perfect Rise Yeast sold in a 3-packet form;
- RED STAR® Platinum Superior Baking Yeast sold in a 3-packet form (with dough improvers derived from wheat flour so it is NOT gluten-free;
- SAF® Bread Machine Yeast;
- bakipan® Fast Rising Yeast; and
- bakipan® Bread Machine Yeast.
We have used Instant Dry Yeast sold in warehouse clubs in air-tight vacuum packaged “bricks” for many years with great success.
Typically 3 methods are mentioned by various cultivators of instant dry yeast when providing instructions for using their instant dry yeast
- One method is to thoroughly mix the instant dry yeast with the flour before adding water (use a wire whisk to accomplish that).
- Another method is to thoroughly mix all the ingredients except the instant dry yeast for one to two minutes. Next sprinkle the instant yeast evenly over the top of the aforementioned mixed ingredients. Continue mixing so as to incorporate the sprinkled yeast thoroughly into the batter or dough.
- A third method is to combine instant dry yeast with lukewarm water using a 1:5 ratio. Wait 10 minutes for the instant dry yeast to rehydrate. Then stir the water and yeast mixture before adding it to the other recipe ingredients.
Typically recipes for either instant dry yeast or bread machine yeast will have directions stating to add the measured amount of yeast directly to the dry ingredients. Next the instructions will say to add any heated liquid(s) (and the temperature of those liquid(s) will be specified in the recipe).
Any form of instant dry yeast typically can tolerate a slightly higher temperature liquid being added IF the yeast was previously properly distributed through the recipe’s dry ingredients. As previously mentioned, use a small wire wisk to accomplish that.
Bread machine recipes will often suggest the water temperature be around 80°F. Recipes that call for large mixing bowls will frequently suggest the liquids temperature be at around 120-130°F. (ALWAYS follow recipe and/or manufacturer directions for maximum temperature to use of any liquids if adding instant or bread machine yeast to dry ingredients).
The reason for this temperature difference when using yeast in a bread machine vs. in a wide rimmed large bowl is quite simple. Usually bread machine recipes have you dump all the ingredients in order into the narrower than a bowl size cavity of the bread machine loaf maker and then close the chamber door and start the machine. The bread machine loaf size pan container (either oriented vertically or horizontally) is kept in a heated closed chamber. It will retain the heat of the liquids, which may actually have been poured directly onto instant yeast granules. A lower temperature of any liquid will thus be sufficient to accomplish the goal in the bread machine of having the yeast leaven the dough. (Again, ALWAYS follow recipe and/or manufacturer directions for maximum temperature to use of any liquids if adding instant or bread machine yeast to dry ingredients). As mixing and kneading progresses in the bread machine chamber, the temperature in the chamber will rise.
NOTE: Keep salt away from the yeast if you use the “dump the ingredients in order” method of adding the ingredients into the bread machine pan. Honestly, it is better to first mix the yeast with the flour(s) being used to disperse the yeast granules. Later, when they come in contact with any other ingredients that can affect their growth such as salt, and even sugar and fat, the exposure is not so overwhelming to all of the yeast granules as it is dispersed and more gradual.
In a large bowl open to the air in your kitchen, once the instant dry yeast granules have been mixed with other dry ingredients, typically warmer water can be added as the dough is mixed by hand or in a tabletop stand mixer bowl. That bowl which is open to the air will allow the temperature of added liquids to drop rapidly as the liquid(s) disperse into the dry ingredients.
Personally, as previously noted, we use a form of warehouse club distributed instant yeast sold in 1 pound hermetically vacuum sealed bricks and store opened yeast in airtight bags in the refrigerator [we use the yeast up in a shorter period of time so don’t need to store it in the freezer]. We do proof the brand of instant dried yeast that we buy. We do this because we are very familiar with the product. We like to rapidly get yeast activated & speed up the time required for many of our baking efforts where other flavors are present in the batters and doughs. Officially, however, we always defer to a manufacturer’s advisement /instructions for use of their product.
It really isn’t hard to work with yeast–in fact, we feel it is very rewarding. Whether you use a recipe that requires you to knead the dough to be as “smooth as a baby’s bottom” or use a no-knead batter recipe, yeast baking can help to make positive holiday memories that can last a lifetime.
“Wholesale” Clubs and some online sellers typically stock single or multiple 16 oz. vacuum packaged “bricks” of instant dry yeast, with tiny amounts of ascorbic acid sometimes added as a preservative. Note that it is frequently much cheaper to purchase the yeast through those warehouse clubs than through any other outlet. This does assume you would use up the amount of yeast being sold before its expiration date. Those packages will note that the Instant Dry yeast doesn’t require proofing to rehydrate. Directions will state to add it to and mix it with dry ingredients before wet ingredients are added to any recipe.
This holiday season, if you know someone else has been wanting to try baking with yeast, why not give them that opportunity to have such a rewarding experience? Purchasing bulk yeast through a warehouse club would enable you to invite them over for some baking with yeast. Additionally, you could easily make up gifts that provide all the ingredients, including the yeast! This could be helpful for someone new to baking with yeast to help them make up a batch of a favorite home baked product they have noted they enjoy when sampling your baked goods. Just keep the yeast properly stored and only add it to the gift just before giving it with clear instructions about handling it.
Whether you enjoy starting a new tradition in your home or want to re-experience a time honored family tradition, why not get some yeast out and get baking?!

